To start, you should know what kind of printer you are using or buying. The most common 3-D printer a newbie will use is called an fused deposition modeling (FDM) printer, which is also sometimes called fused filament fabrication (FFF). The other type of widely-available printer is a resin-based printer technology called stereolithography (SLA). The two technologies are quite different but I am going to focus on the FDM type as it is more common. Other printer types do exist such as selective laser sintering (SLS) but these are not nearly as common and are more expensive.
FDM printers use the principle of a nozzle and a plastic filament. The filament is fed into the heated nozzle where it melts and is extruded out. Think of it like a hot glue gun where the glue stick is fed in the back and comes out as liquid plastic. The difference is that the filament does not liquefy as much as the glue gun and it is fed at a very controlled rate, heat, and movement.
The first thing to be aware of is that not all printers are created equal and some w Subhashish Panigrahi/CC BY SA 3.0ill require a more hands-on approach than others. Even high-end printers may at times require some attention and issues still occur, such as clogs or parts that haven’t correctly adhered to the build plate. It is beneficial to understand the working parts of the printer and what may go wrong as it will make taking care of these issues less of a hassle.
One of the first decisions will be what kind of material you want to print with. The two most common materials are polylactic acid (PLA) and acrylonitrile butadiene styrene (ABS) although glycol-modified polyethylene terephthalate (PETG) is gaining popularity. It is important to be aware that not all printers can print all types of materials, so make sure to consult the user manual before you put any material in the printer.
Different materials have different settings. ABS requires a higher temperature than PLA to print, and ABS also requires a heated bed. Make sure you set the printer to the correct settings for the material you are using. Which material you decide to use will also depend on the finished part. PLA, while easier to print with may melt in a hot car; ABS is more durable but less user-friendly due to printing difficulty and the fumes it creates.
You need to properly store your filament as well. In most cases this requires keeping the filament in a low humidity environment. Most filaments absorb water over time and when they do, the print will suffer or not work at all. To keep this from happening filament should be stored in an airtight container with a desiccant. It is a good idea to only buy the filament you will use relatively soon. Most filament comes sealed in plastic with a desiccant and it is a good idea to leave the plastic sealed until you need the filament material.
The print needs to stick to the printer bed. This may sound simple but sometimes things just don’t stick well. Part of the reason is that as the plastic parts cool, they tend to curl which causes them to come off. A head bed will help if this is a problem, but it depends on the material as some don’t curl much.
Not everything is printable on every printer. This is important as some designs just can’t be printed or may 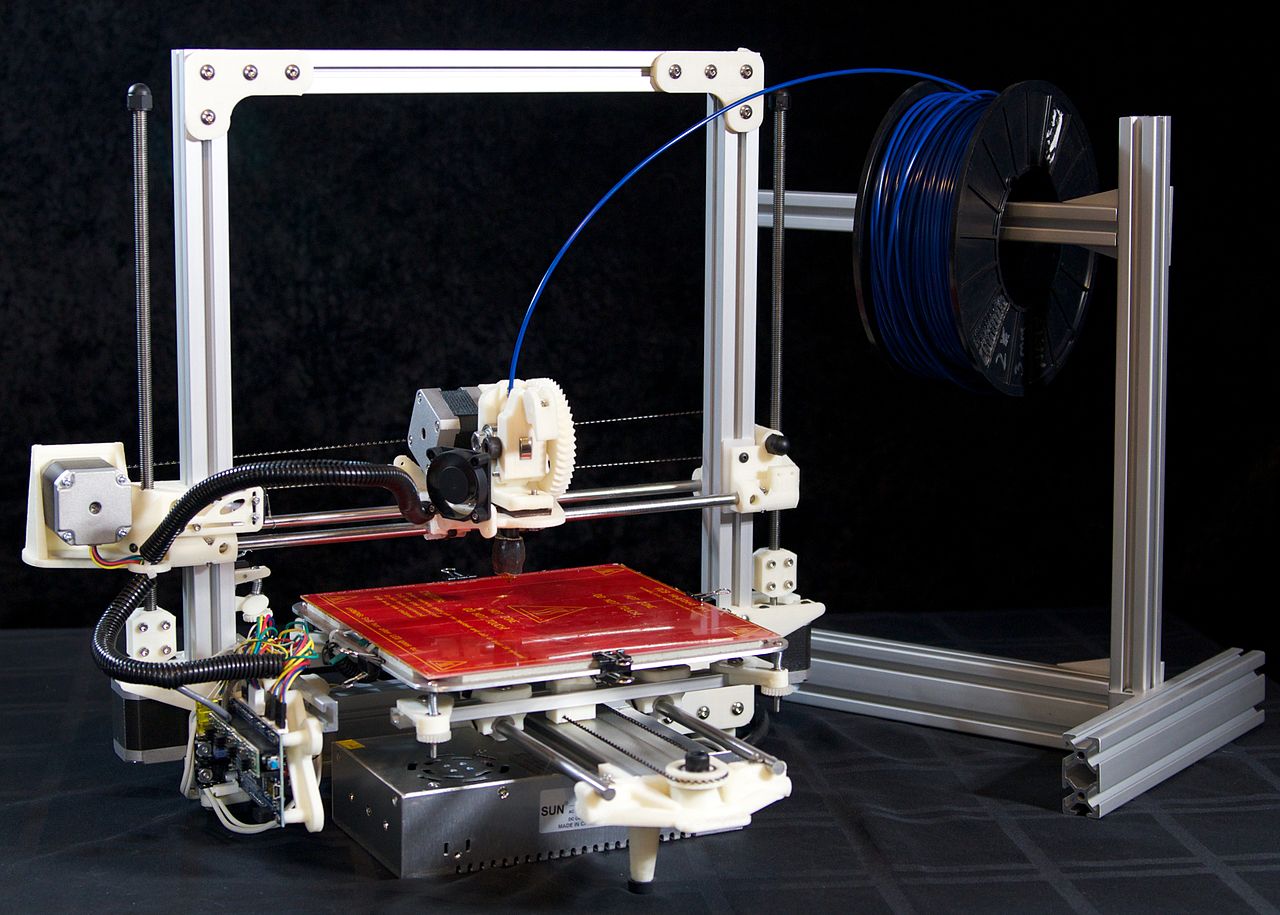 require modification to be printed. Many designs that are found online may have never been printed before so make sure what you want to print can be printed on the machine you have available. Software can help you figure out what can be printed but often it will take common sense as well.
FDM printers can’t print things in mid air they require support under everything that is printed. Other printing methods such as SLS can print things without support as they print in a powder which provides support. On an FDM printer you could print a pyramid without too much difficulty but if you try to print it upside down, with the tip of the pyramid on the printer plate, you are going to need to print supports around it too.
FDM printed parts have an inherent grain in the part and this is due to the layer method the printer works by. This grain will have an impact on the strength of a part, where it will be weaker in one dimension and stronger in another. If what you are printing requires some level of strength, consider which is the best orientation to print it in.
Most parts you print will not be solid. Instead most will have some type of internal support that you get to decide on. Internal voids will reduce the amount of material needed and also the weight of the part, although it may reduce the strength as well. You can adjust the amount of fill inside the part and the shape of the fill, such as a rectilinear grid of boxes or hexagonal like a honeycomb, depending on the strength required.
 The software you use is important, both to design the part and to prepare it for printing. Typically a part is designed in computer aided design (CAD) software of various complexities. Often someone starting out will simply downloading a design someone else has created and made available online. Typically, designs are shared as STL files, which also stands for stereolithography, although the format is used for all types of printers.
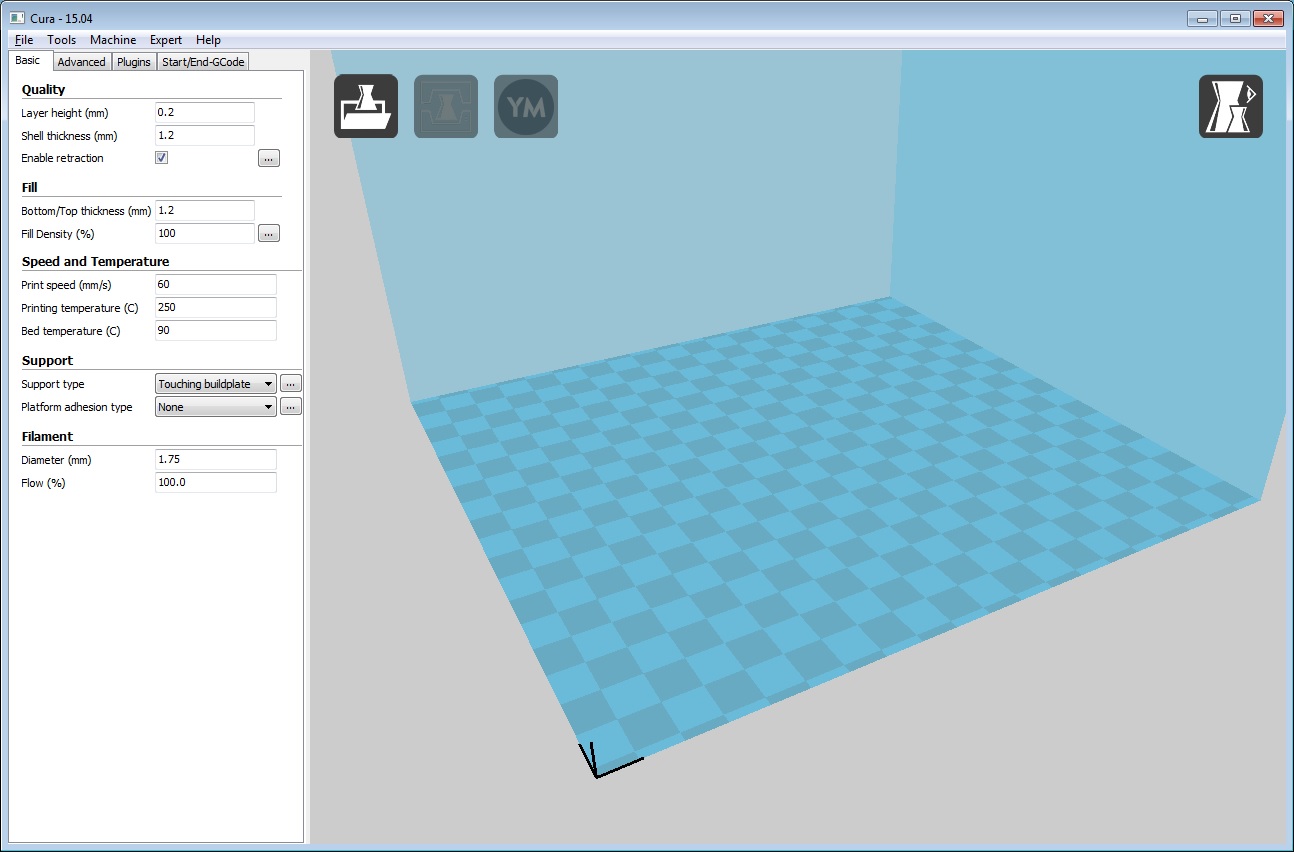
After you have a design that can be printed the next step is to prepare it for printing. This is typically done with what is called slicer software. The slicer software takes the CAD design and virtually slices it into many layers, for which it calculates the movements the machine needs to make to produce each layer. The resulting file with all the movements is called G-code and is typically what is fed into an FDM machine. Luckily, lots of software for 3D printing is free and works great, so you can try different software until you find what works best for your use.
When someone slices a file they must make some decisions. This is where you will tell the machine how hot to get for the filament or build plate and how thick each layer should be, as well as how fast the printer should go. Factors such as the temperature and speed are material dependent. Others choices, such as the layer height, depend on how detailed you need the final part to be; the smaller the height, the higher resolution the part can be. The slicer is also when you can rotate a part or shrink or expand it, as well as determine if you want to print multiple parts.
Large parts can take hours or even days to print. If the printer gets clogged or messes up during the print it is likely that you will not be able to fix the part. When you are starting out it is best to start with parts that can be finished in under three hours. On most FDM printers parts that are about 2 inches or less in height and width can be done in three hours or less. The time the print takes depends on many factors, including the choices made in slicing and in the machine itself. Printing larger parts is fine, but it is best to know what the printer can and can’t do first so you don’t waste material and time.
While some of this may sound confusing it ends up being quite simple once you have a number of prints under your belt. Before you know it your printer will be an indispensable tool used to create your unique ideas or print that broken or missing part.
